
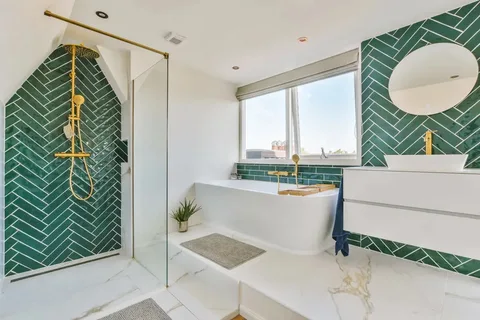
Integrating diamond geometry into a bathroom remodeling project fundamentally alters how spatial proportions are perceived. Most residential bathrooms are rigid, boxy enclosures bounded by 90-degree right angles. Standard straight-laid grid patterns often accentuate spatial limitations, drawing direct attention to narrow walls or off-center fixtures.
A diamond layout introduces dynamic 45-degree diagonal lines. These angled sightlines guide the human eye outward toward room corners rather than stopping dead at parallel walls. The visual result is an immediate perception of increased floor acreage, enhanced ceiling height, and intentional architectural depth.
Whether your goal is expanding a compact powder room floor, installing a 3D geometric shower accent wall, or surrounding an angular freestanding bathtub, this guide details the exact planning, material selection, and execution steps required for a seamless diamond bathroom renovation.
Spatial Dynamics: How Diamond Geometry Changes Room Perception
Before purchasing materials or cutting subfloors, you must match the diamond application to your specific room layout. Diagonal lines alter visual scale in three distinct ways:
1. Expanding Horizontal Floor Space
When square or rectangular tiles are laid parallel to bathroom walls, the parallel grout lines run directly ahead of the viewer, emphasizing the exact distance between opposing walls. Setting those same tiles at a 45-degree diagonal angle creates diamond shapes that point toward the corners. This trick forces the brain to calculate space diagonally—the longest physical dimension in any rectangular room—making narrow layouts feel significantly wider.
2. Vertical Wall Elongation
Elongated diamond tiles (rhombus shapes) placed vertically on shower walls or vanity backsplashes create an upward visual velocity. The repeating pointed apexes draw focus up toward the ceiling line, making standard 8-foot bathroom ceilings appear grander.
3. Depth Illusion via 3D Rhombus Patterns
By combining three distinct tones (light, medium, and dark) of rhombus-shaped tiles in a repeating diamond cube layout, you create an optical illusion of physical depth. This technique is particularly effective on back walls of glass-enclosed shower stalls, visually pushing the rear wall back.
Primary Applications for Diamond Designs in a Remodel
1. Diamond Floor Tile Installation Strategies
Floor remodeling represents the most frequent application of diamond layouts. However, achieving flawless execution requires strict preparation.
Selecting Tile Scale vs. Room Size
-
Large-Format Diamond Tiles (12×12 inches up to 24×24 inches): Recommended for medium-to-large bathrooms. Larger individual diamonds translate to fewer grout lines, yielding an uninterrupted floor plane that keeps complex layouts from looking busy.
-
Small Diamond Mosaics (1-inch to 2-inch sheets): Best reserved for shower pans and small powder room floors. The high density of diagonal grout lines provides crucial non-slip traction underfoot in wet areas.
Material Waste Calculations
Standard straight-grid tile layouts require a 10% waste factor for cut edges. Diamond floor layouts require 15% to 20% waste factor.
Because every tile meeting a wall, vanity base, or threshold must be cut on a precise 45-degree angle, edge scrap rates are substantially higher. Always order sufficient overage from the same manufacturing batch to avoid shade variations.
Establishing the Center Working Line
Never begin laying a diamond floor pattern along an exterior wall. Most residential walls are slightly out of square; starting against a crooked wall will cause your diamond points to drift out of alignment across the floor.
       [ Far Back Wall / Vanity Line ]
                  |
         /\       |       /\
        /  \      |      /  \
       /    \     |     /    \
      \      /    |    \      /
       \    /  CENTER  \    /
        \  /     LINE   \  /
         \/       |      \/
                  |
         /\       |       /\
        /  \      |      /  \
       /    \     |     /    \
      \      /    |    \      /
       \    /     |    \    /
        \  /      |     \  /
         \/       |      \/
                  |
        [ Main Doorway Threshold ]
-
Find the exact midpoint of the room between opposing walls at both the doorway and the far wall.
-
Snap a chalk line connecting these midpoints to establish your primary axis.
-
Position your first diamond tile so its top and bottom points rest precisely along this chalk line.
-
Work outward from the center axis toward both side walls so perimeter cut tiles remain perfectly symmetrical on the left and right sides.
2. Shower Enclosures and Accent Walls
Vertical diamond applications transform plain tiled showers into custom art installations.
Managing Visual Scale in Enclosed Spaces
-
Monochromatic Grout for Small Showers: If your shower stall is compact, select a grout color that closely matches your diamond tiles. Matching grout softens the geometric grid, delivering texture without overwhelming the enclosed space.
-
Contrasting Grout for Feature Walls: In large walk-in showers, contrasting grout highlights the precise geometric angles of diamond tiles, turning the shower wall into the primary visual feature of the entire room.
Waterproofing Geometric Nooks and Ledges
When installing diamond tiles around shower niches or bench ledges, detail cuts carefully:
-
Keep top ledges solid: Use a solid piece of stone or quartz for niche thresholds rather than piecing together cut diamond tiles where water can pool.
-
Align niche geometry: Position shower niches so their outer frames align with the tips or centers of surrounding diamond tiles rather than cutting arbitrarily across a diamond point.
3. Diamond-Cut Freestanding Tubs
For high-end master bathroom remodels, a diamond-cut or faceted freestanding bathtub offers an unparalleled geometric centerpiece.
Clearance Requirements
An angular, faceted soaking tub needs breathing room to display its light-reflecting exterior planes.
-
Maintain at least 18 to 24 inches of clear floor area around all sides of the tub.
-
Avoid cramming a diamond-cut tub into an alcove; tight placement ruins the multi-angled silhouette and creates cleaning pockets that are difficult to reach.
Lighting and Plumbing Setup
-
Directional Lighting: Install overhead recessed spotlights or a statement chandelier slightly off-center from the tub. Overhead light striking the faceted ridges creates natural highlights and shadows that emphasize the tub’s architectural geometry.
-
Rough-In Floor Plumbing: Floor-mounted fillers should be positioned precisely relative to the tub’s angular lip before closing the subfloor. Ensure water discharge falls cleanly into the drainage center without splashing off interior angled walls.
Maintenance and Long-Term Durability
Because diamond installations feature an increased linear footage of grout lines and diagonal cut edges along baseboards, follow these maintenance guidelines:
-
Flexible Perimeter Caulking: Never use rigid grout along floor-to-wall transitions or baseboards. Diagonal cuts undergo micro-expansion as floor joists shift; seal all perimeter edges with flexible 100% silicone sealant matched to your grout color to prevent edge cracking.
-
Protecting Faceted Fixture Ridges: Clean acrylic or composite diamond-cut tubs using non-abrasive, pH-neutral cleaners and soft microfiber cloths. Avoid harsh scouring pads that can scratch or dull the sharp exterior ridge points over time.